Those of you looking to buy a shower base for a handicap accessible bathroom are at the right place. The article below will be your comprehensive guide to buying shower bases, with a focus on handicapped people.
II. Barrier Free Shower Pan for Handicap Showers
III. What Are Types of Shower Tray Bases?
IV. Materials and Sizes of Shower Trays
IV. Pricing: How Much Does Best Shower Base Cost?
IV. Installing a Shower Base
Shower Base Definitions: What’s What
 Foremost, it’s important to state that even though the terms shower base, shower pan, shower tray, and shower receptor are used as synonyms, they, in fact, have key differences. These tend to be confused due to the same function they perform.
A shower base and a shower pan is a finished area that is quite capable of both directing but also retaining water in the drain. It also doesn’t require tilling once installed. Both consist of a drain hole, have a sloped floor to help them properly direct water, a threshold, and sidewalls. There are some differences in the function between the two.
As far as the installation is concerned, the shower pan is a single piece unit that fits into the shower alcove and is easy to install whereas the shower base requires more time and preparation to install properly.
A shower tray and a shower receptor are indeed synonyms. They are both used in place of a liner but are pre-formed so as to eliminate some annoying installation steps. Basically, they have the same function as the liner but are simpler.
Finally, a shower liner is a plastic barrier whose purpose is to trap the water that gets to the shower floor and force it back to the drain.
Barrier Free Shower Pan for Handicap Showers
 Not all of us are as fortunate to be able to use a normal shower. Some need assistance. That’s why handicap accessible shower bases and pans exist – to make the lives of the people who need them easier.
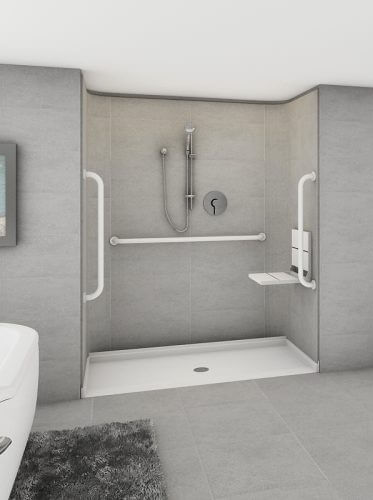
Handicap accessible shower bases. You may have heard of these, but found no reason why they were so special. Well, the heart of the matter is that they have no thresholds. This means that there are absolutely no barriers when getting in and out of the shower.
Replacing your tub or converting your existing shower with handicap accessible shower bases is definitely the safest bet.You could also add grab bars for extra safety.
Handicap shower pans. Walk-in shower pans are a safer alternative for the elderly or handicapped. The danger of stepping into a bath tub is eradicated. These allow for wheelchairs and any other commodities a handicapped person might need to enter safely, with no risk of falling due to slip-resistant floors.
What Are Types of Shower Tray Bases?
Shower tray bases are something that shouldn’t be overlooked since they can surely be named the most important part of your shower. Simply put, if the base isn’t assembled correctly and of a great quality, the whole structure could collapse.
They come in many different shapes and sizes, depending on the proportions of your bathroom. The shape and size go hand in hand, really.
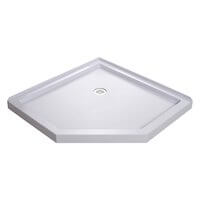
| Corner shower tray bases | |
| They provide a comfortable amount of space for showering but is designed to be fit into a corner. | Find Now |
| Square shower tray bases | |
| Made for small bathrooms, but large sizes are also available. | Find Now |
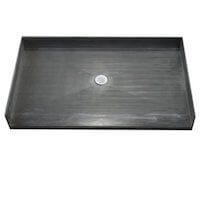
| Rectangular shower tray bases | |
| These offer more space than the square shaped ones and are often used to replace alcove bathtubs. There are especially convenient for handicap people because they can have an intergraded seat making it easier to shower. | Find Now |
Many different shapes exist because an array of diverse bathroom designs are present and everyone needs something to fit their needs. Therefore, we have rectangular trays, quadrant shower trays, everstone shower trays, D-shaped shower trays, and square shower trays. Among all the choices, two seem to be the most popular with people looking to renovate their bathroom.
| Corner Shower Tray Bases | Rectangular Shower Tray Bases | ||
|---|---|---|---|
| Pros | Cons | Pros | Cons |
|
|
|
|
Materials and Sizes of Shower Trays
The two most frequent concerns about shower trays are the shape and size. As far as size is concerned, due to the restricted space modern bathrooms offer, shower trays have been built in accordance, so they can fit without a problem. Most often, they range from 25 mm to 40 mm in height. The average width and depth are between 700 mm and 1700mm.
The main materials used in making shower trays are white acrylic and stone resin. The white acrylic makes them appear stylish, makes it easier to clean and comfortable to use whereas the stone resin mimics actual stone thereby sustaining durability. You may also come across bases made from other materials like plastic, ceramic, porcelain, fiberglass, or granite.
Pricing: How Much Does Best Shower Base Cost?
The price depends on all the above-mentioned information. However, there are some ranges that can be mentioned. For example, an average price for a shower pan is usually around 1000 dollars, but can go as low as 350 dollars. Shower trays are cheaper, and usually cost around 50 dollars. Shower bases are more expensive, and are usually around 200 dollars, though the best shower bases, or bases, can cost up to 1000 dollars.
Installing a Shower Base
Many are probably puzzled by the installation process of shower bases. Follow these steps on how to install shower bases in order to unveil the mystery:
Step 1. Measure the size of the actual hole or drain.
Simply get into the shower base on the floor. Then, draw its outline while not forgetting to measure the length and width. You should also leave some room, like an extra 20 millimeters, just in case.
Step 2. Drill some holes.
So as to make it easier to cut out, drill holes at the corners of the square you’re cutting. Use the angle grinder to cut out the square in the fiber cement board. Don’t forget to use safety gear so as not to get hurt.
Step 3. Prepare the recesses.
Place the shower base in the hole and determine its height, then use a hammer and chisel, or whatever tool you find appropriate, to make 10-millimeter recesses for the shower base. You will have to repeat this process and make 10-millimeter recesses in the timbers running across the length and width of the shower base. Don’t forget to wear gloves.
Step 4. Determine whether the floor is level.
Don’t undermine this step since it will help you determine which areas need more cement in order to level the floor. Use a spirit level, for example, to check the levels across the whole surface.
Step 5. Prepare the cement.
Combine one part mortar with three parts of brickies sand, then gradually add some water, and then slowly mix everything. Do this until the cement has a nice consistency, and isn’t too grimy or watery.
Step 6. Prepare the base.
Lay the concrete base on the floor, using your shovel, so it covers all shower base. Add extra concrete if needed to make the base level. Once you do, use your spirit level, just in case.Step
7. Insert nogs.
Do this so you can be certain that the shower lining will stay right there where it should be. Measure it correctly so there is enough space between the nogs, then use a saw to make them the right size. Finally, fix them all in place with a couple of nails.
Conclusion
So there you have it. All you need to know to assist your loved ones. They will be overjoyed when you make their lives easier, and especially when they realize the effort you put into this. You have the tools, you have the instructions, and you know which materials to use, so have at it and make someone close to you smile!